Connect your AI agent
Give Claude, Cursor or any MCP client a key to your diagrams, pick the tools it sees, and keep diagrams in step with your code.
What you'll get
- An API key for your agent
- The Modudraft MCP server in your client
- Diagrams your agent draws and updates
Create an API key
Your agent signs in to Modudraft with an API key. Open Account, then API keys, and click Create key. API keys come with Pro, or a Pro trial.
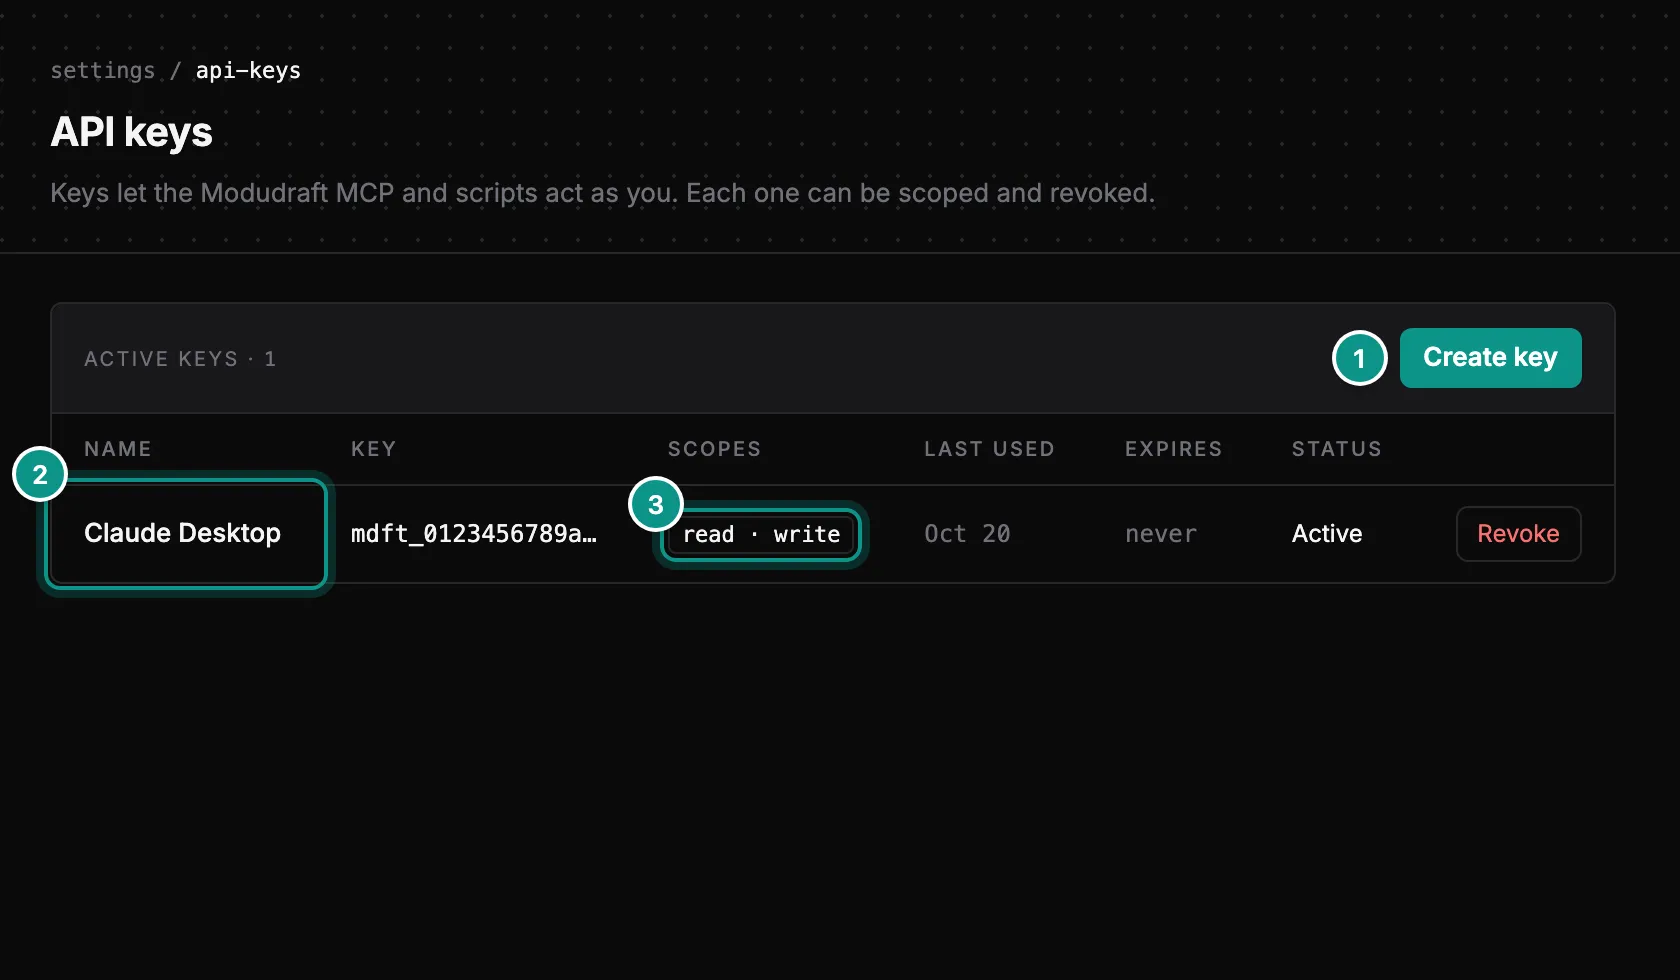
Name the key after the place it will live, such as Cursor (1). Pick when it expires (2): 30 days, 90 days, 1 year or No expiry. Then pick its access (3). Read & write is the default, and most MCP tools need it. Read only lets the agent look at diagrams but change nothing. Click Create.

The key starts with mdft_, and you see it only once. Click Copy & hide to copy it. If your session is older than 15 minutes, Modudraft asks you to sign in again first.
Add the server to your client
Right after you create a key, the page also shows an MCP config for Claude Desktop and Cursor with your key in it. Later you only see the list: your keys (2), their scopes (3), when each was last used and when it expires. Create key (1) makes another, and Revoke stops one at once. A key that goes unused for 90 days is revoked for you.
There is nothing to install. Your client starts the server with npx.
Claude Desktop: add this to ~/Library/Application Support/Claude/claude_desktop_config.json and restart Claude Desktop.
{
  "mcpServers": {
    "modudraft": {
      "command": "npx",
      "args": ["-y", "@modudraft/mcp"],
      "env": {
        "MODUDRAFT_API_KEY": "mdft_your_key_here",
        "MODUDRAFT_PROJECT_ROOTS": "/Users/you/code/your-repo"
      }
    }
  }
}
MODUDRAFT_PROJECT_ROOTS is optional. Set it to the repo your agent should read files from and write files to. Claude Desktop starts the server from /, so its file tools stay off until you set it.
Cursor: add this to .cursor/mcp.json in your project, or to ~/.cursor/mcp.json for every project.
{
  "mcpServers": {
    "modudraft": {
      "command": "npx",
      "args": ["-y", "@modudraft/mcp"],
      "env": {
        "MODUDRAFT_API_KEY": "mdft_your_key_here"
      }
    }
  }
}
Claude Code and any other MCP client: point it at npx -y @modudraft/mcp with MODUDRAFT_API_KEY set. In Claude Code, that is one command in your repo:
claude mcp add modudraft -e MODUDRAFT_API_KEY=mdft_your_key_here -- npx -y @modudraft/mcpThese clients usually work in the folder you have open. If a file tool says file access is disabled, add MODUDRAFT_PROJECT_ROOTS with your repo’s path, as in the Claude Desktop config.
Pick toolsets
By default your client sees the core tools plus the modeling, import and analysis groups, and your agent adds other groups when it needs them. To choose yourself, set MODUDRAFT_TOOLSETS in the same env block:
corelists only the core tools: managing and searching diagrams, components and arrows, drawing a diagram as text, the tool catalog and your org’s context.- A list of groups, such as
sequences,api, lists the core tools plus those groups. alllists everything. Leaving it unset gives the default above.
The groups are modeling, sequences, database, api, infra, data_flows, views, import, export, analysis, project, history, security and states.
Your agent can add a group while it works with load_toolset. If your client does not refresh its tool list after that, set MODUDRAFT_TOOLSETS instead. Calling a tool by its name works even when it is not listed, if your client lets the agent call a tool it was not shown.
Ask for a diagram
Ask in plain words. Your agent picks the tools and calls them. Each call reads the diagram from Modudraft, changes it and saves it, and the change shows in the web app straight away.
- You
Scan this repo and draw its architecture in a new Modudraft diagram called Checkout platform.
scan_projectListed the files it can import:docker-compose.yml,api/openapi.yamland thepackage.jsonfilescreate_diagramCreated Checkout platform and returned its idimport_fileImporteddocker-compose.yml: a component for each service, and an arrow for eachdepends_onimport_fileImportedapi/openapi.yamlinto the API tab of orders-servicelayout_diagramLaid the diagram out left to rightget_share_linkMade a view link- Agent
I drew Checkout platform from your compose file. Each service is a component, with an arrow to each service it depends on. The orders-service endpoints from
api/openapi.yamlare on its API tab.Open it from the link, or ask me to add the database tables next.
Keep it in sync
First, ask your agent to watch the repo for a diagram. It notes the files it can import, as they are now. After the code changes, ask it to check the diagram against the repo: it sees which files changed, reads them and updates the diagram.
- You
Watch this repo for the E-commerce checkout diagram.
watch_projectLinked the repo to the diagram and took a snapshot of the files it can import- Agent
I'm watching this repo for E-commerce checkout. After you change the code, ask me to check it.
- You
I added a service. Check the diagram against the repo and fix what changed.
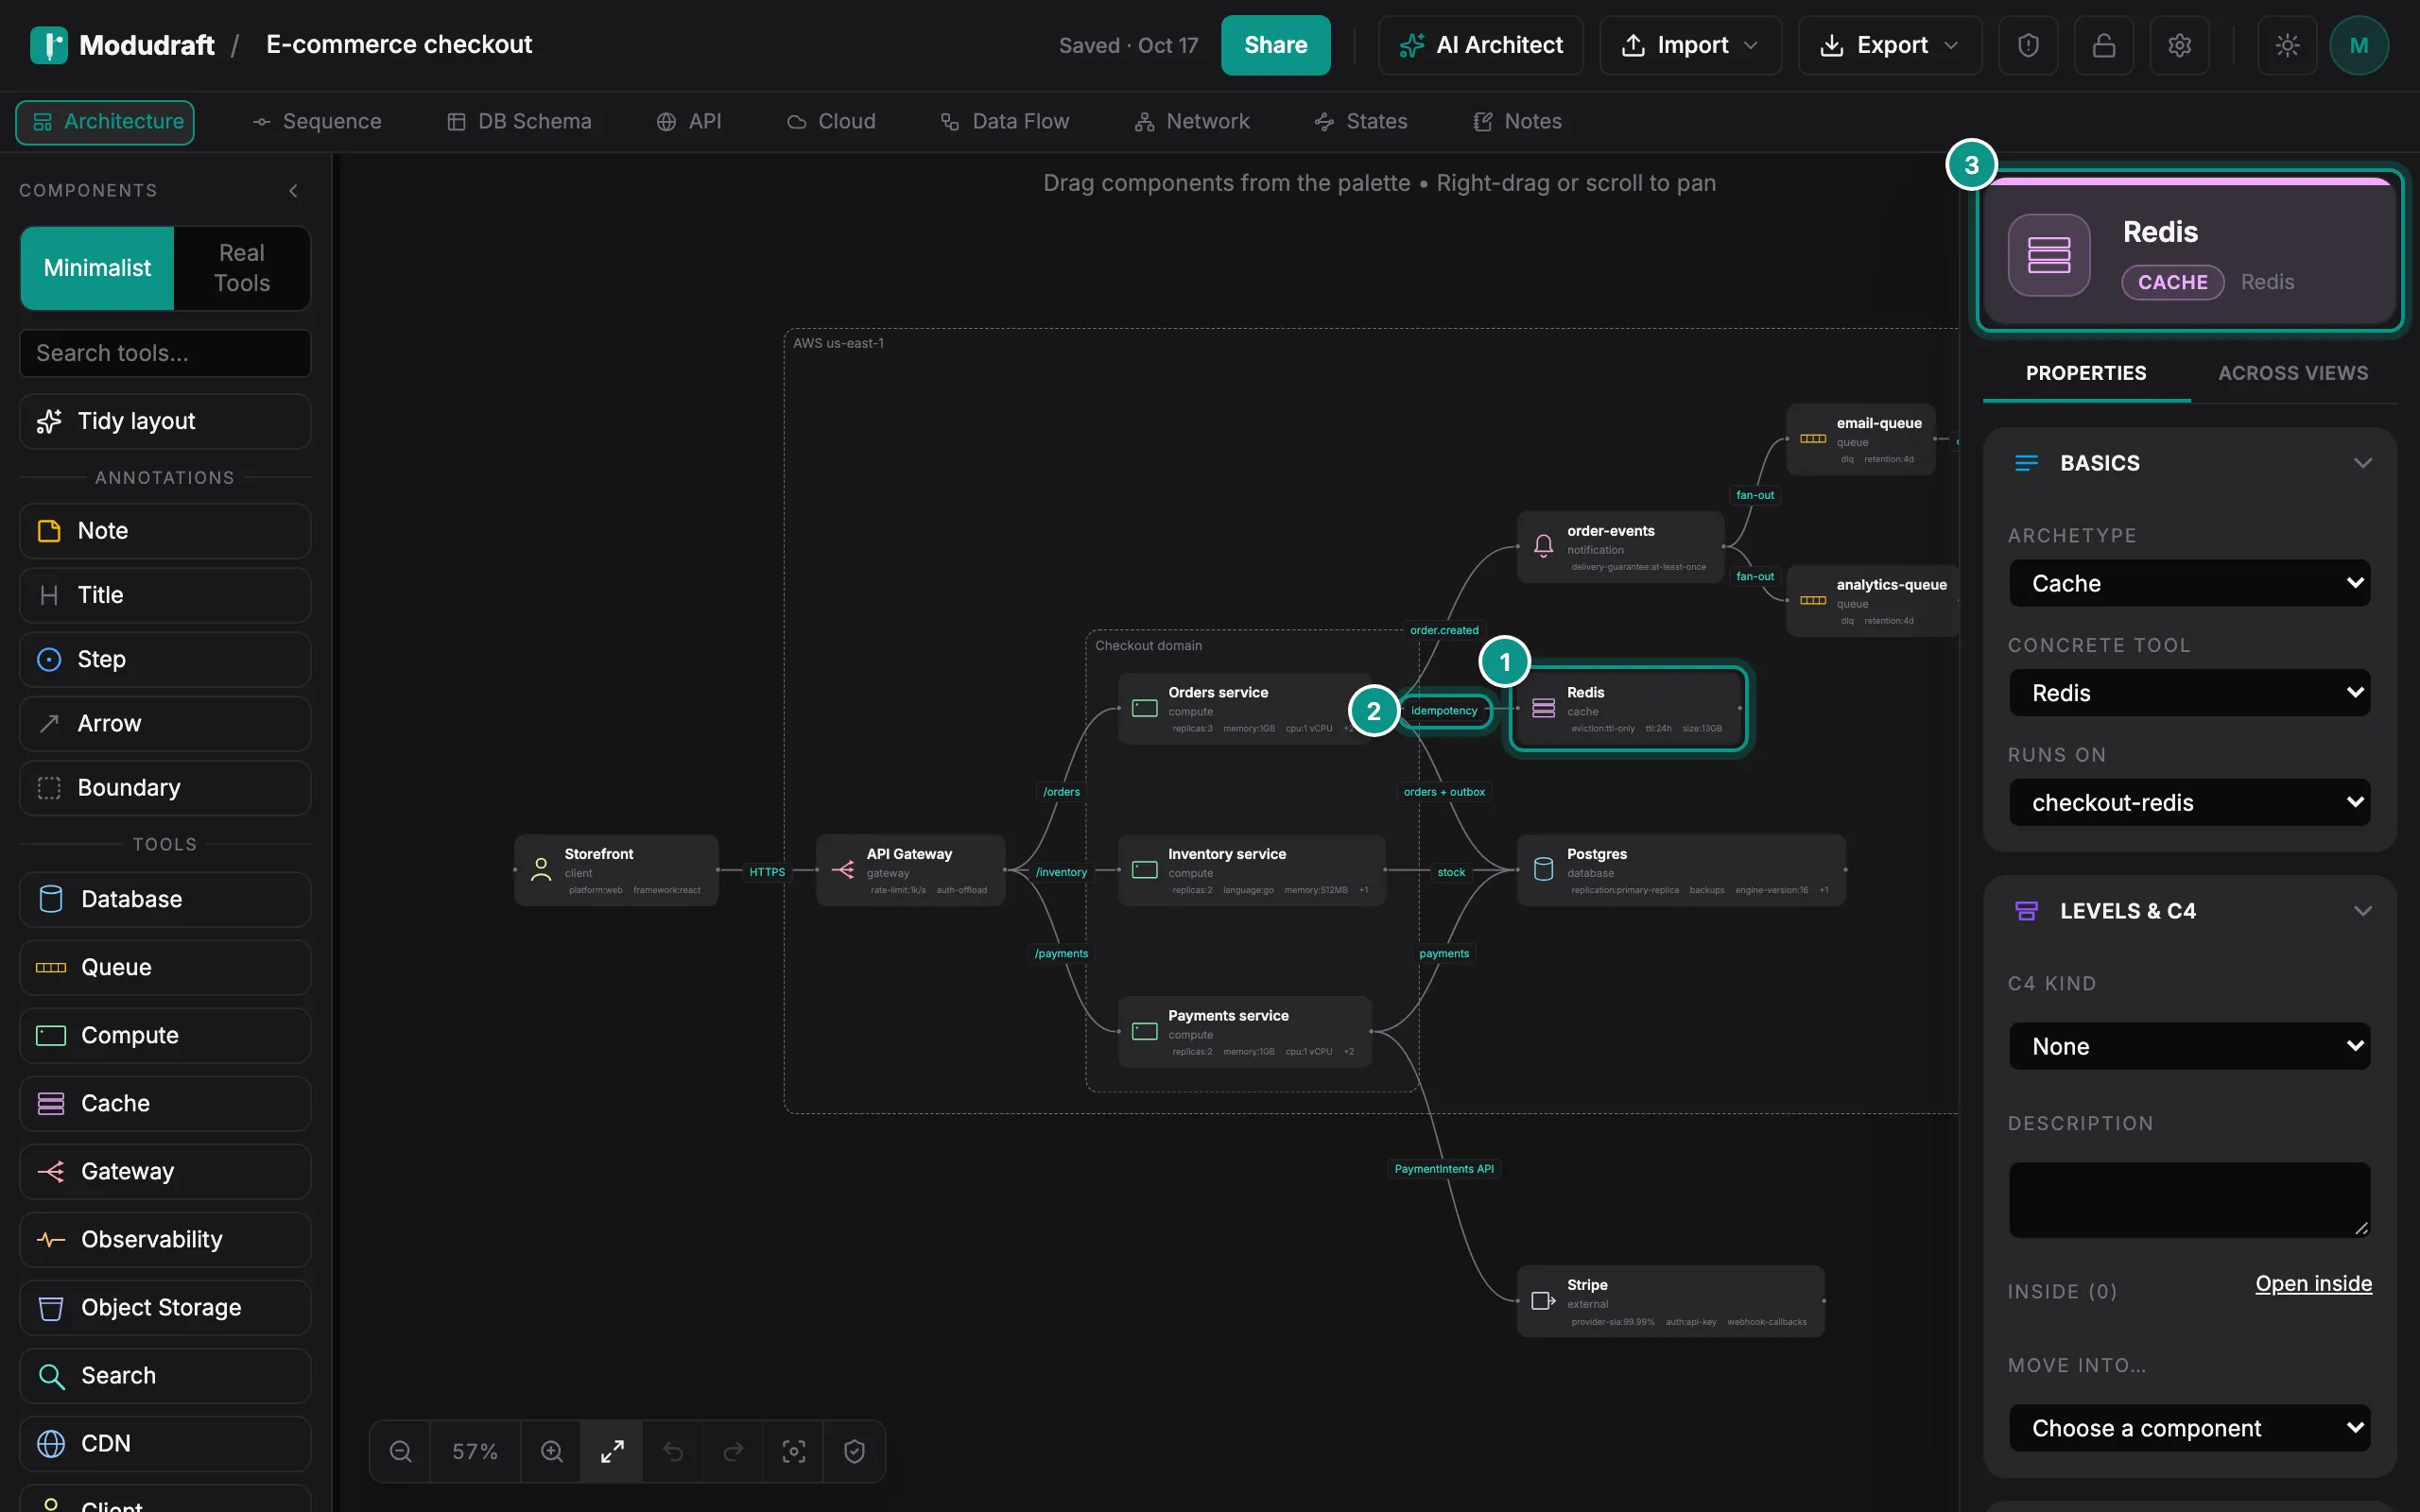
check_project_driftdocker-compose.ymlchanged since the snapshotread_fileReaddocker-compose.yml: a newredisservice, which orders-service uses for idempotency keysadd_nodeAdded Redis as a cacheadd_edgeConnected Orders service to Redis, labelled idempotencycheck_project_driftCalled withacknowledge: true: marked the change as handled, so it is not reported again- Agent
The diagram was missing Redis, which Orders service uses for idempotency keys. I added it as a cache, with an arrow from Orders service. No other files changed.
Redis (1) is now on the canvas, with the arrow from Orders service (2). Select it to check what the agent filled in (3).
To catch drift on every pull request without asking, add the drift check to your CI.